Non-Destructive Conversion
By introducing the Non-Destructive Modular Framework (NDMF) into your project, you can convert avatars during the build process. You only need to save the avatar before conversion in the scene, and you can also work with other non-destructive tools.
Installing NDMF
If Modular Avatar or Anatawa12's AvatarOptimizer is installed in the project, NDMF is already installed.
If you want to install NDMF manually, follow these steps:
- Add the repository to VCC from the Modular Avatar website.
- In VCC, select the avatar project to which you want to add NDMF.
- Click the Manage Project button.
- Click the ⊕ button on the Non-Destructive Modular Framework row.
- The latest version of NDMF will be added to the project.
Avatar Settings
As usual, add the Avatar Converter Settings component to the avatar and configure the conversion settings.
In a non-destructive workflow, you may need to add additional components to make all adjustments during the build.
Assigning Network IDs
By adding the Network ID Assigner component to the avatar, network IDs are automatically assigned to PhysBones. The IDs are assigned based on the hash value of the hierarchy path. So even if objects are added or removed, the same ID is assigned, and that allows PhysBone synchronization between PC and Quest.
At this point, upload the avatar for PC once to reflect the network IDs.
Deleting Blush Meshes
Configure the deletion of blush shape key meshes. Here, we use the AAO Remove Mesh By BlendShape component of Anatawa12's AvatarOptimizer as an example.
Add the Remove Mesh By BlendShape component to the face mesh and turn on the checkbox for the blush shape key you want to delete.
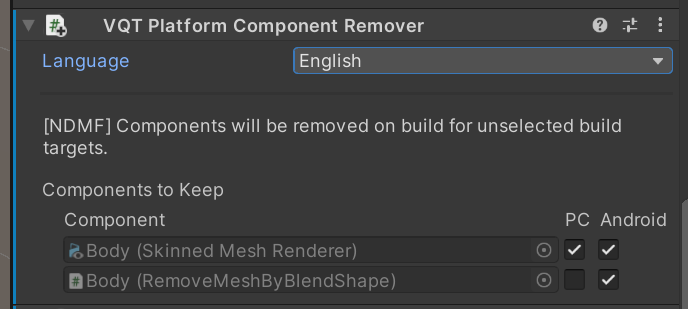
Deleting Meshes Only for Android Builds
As it is, the blush shape key mesh will be deleted even for PC builds. Therefore, add the Platform Component Remover and turn off the PC checkbox. This will remove the Remove Mesh By BlendShape component for PC builds, and the blush shape key mesh will not be deleted.
Testing the Avatar
Before uploading the avatar, test it on your devices.
To test on Android, connect your Android device with a USB cable and enable debugging.
Reference:
Testing with Android Settings on PC
You can test avatars with Android settings on your PC using the hierarchy right-click menu.
- Select the avatar in the hierarchy that you want to test.
- Right-click the avatar and select VRCQuestTools > [NDMF] Build & Test for PC with Android Settings.
- The avatar will be built with Android settings and appear in the Others section of the VRChat avatar list.
- Launch VRChat and test the avatar.
Uploading the Avatar
After testing the avatar on PC, upload it to VRChat. There are following ways to upload the avatar with non-destructive conversion:
- Regular Upload (VRChat SDK)
- Multi-Platform Build (VRChat SDK)
- ContinuousAvatarUploader
Regular Upload
Since VRChat SDK 3.8.1, you can start uploading the avatar even if the avatar in the scene does not meet the Android-compatible conditions. Open the VRChat SDK control panel and upload it as you would for PC.
Multi-Platform Build
You can upload the avatar for both of PC and Android by using the Multi-Platform Build of VRChat SDK 3.7.6 or later.
- Change the Unity build settings to Windows.
- Open the VRChat SDK control panel and select the avatar to upload in the Builder tab.
- Select Windows and Android in the Platform(s) settings.
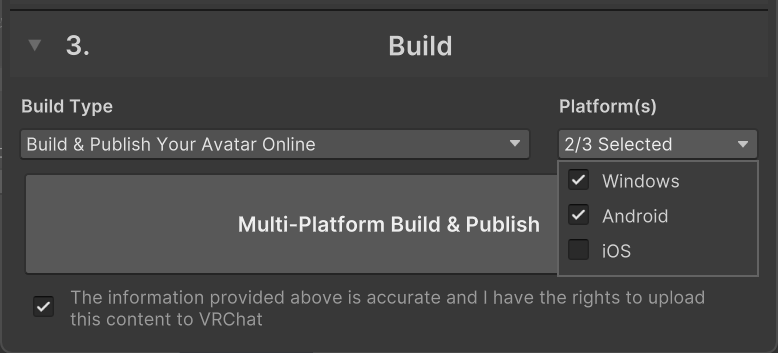
- Click the Milti-Platform Build button.
- The avatar will be uploaded for both of PC and Android.